Windows Terminal 终极美化
安装 Window Terminal
有两种安装方式,这个要自行选择
git 安装
1.0+ 正式版本已经发布了,不需要自行编译了。直接去Github Window Terminal 下载安装即可
商店安装
在微软商店里搜 windows terminal,安装即可。
1、商店打不开的,自行解决,直接了当的方式就是升级系统到最新版本,重启。
2、提示当前所在的区域不支持的话 :
登录账号的进账号把自己所在区域地址改成美国,然后把系统时间设置成美国。重启
正常情况下,你会安装成功的。 可以继续往下看了,先放一张图:
For Windows Terminal:

For VSCode:
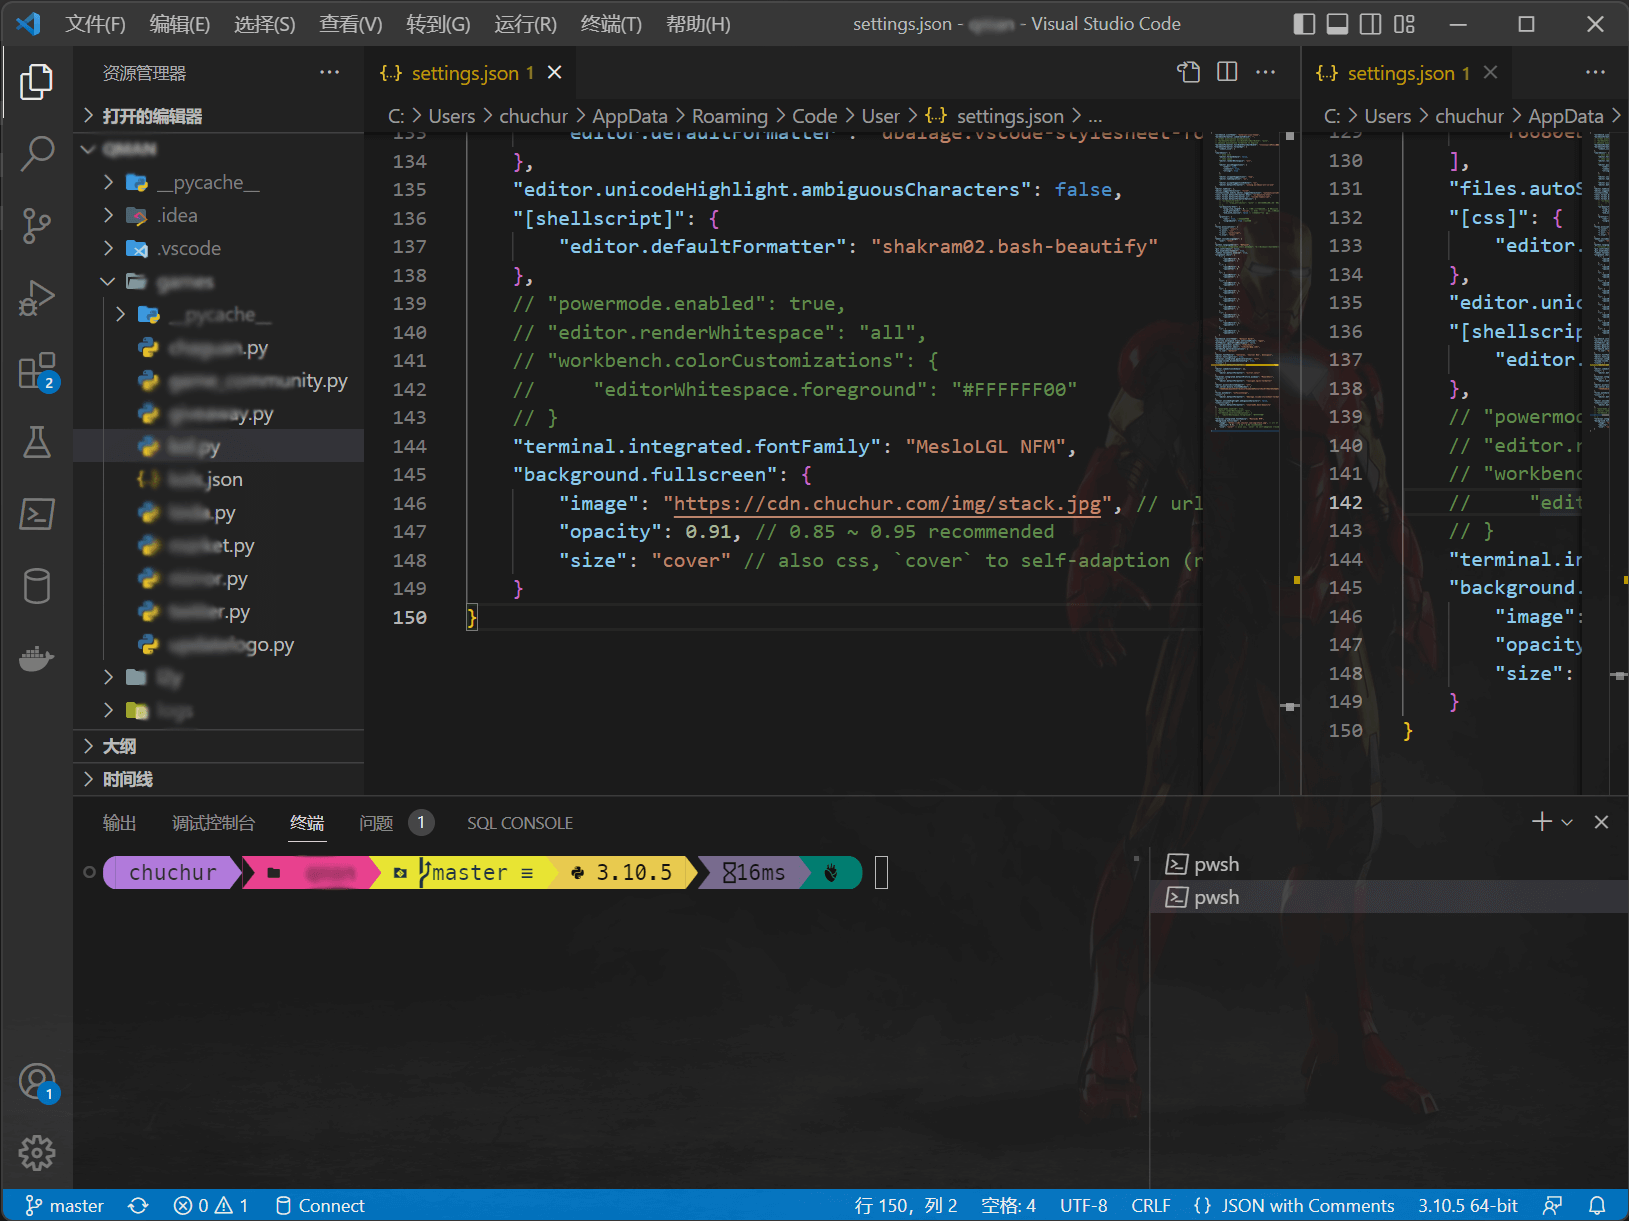
关于`斯塔克的背景图,在底下评论区填写正确的邮箱,不出意外的话,你就能收到了,图片高清4K无码,有些大,就没放上来了
下面开工:
配置解释
用到的就以下这些了,其他用不着的就不写了。
"profiles": {
    "defaults": {
      "acrylicOpacity": 0.5, //毛玻璃透明度(0-1)
      "useAcrylic": true, // 启用毛玻璃
      "backgroundImage": "D:/User/chuchur/OneDrive/图片/stack.jpg", //背景图片
      "backgroundImageOpacity": 0.1, //图片透明度(0-1)
      "experimental.retroTerminalEffect": false, //复古的CRT 效果
      "backgroundImageStretchMode": "uniformToFill", //背景图片填充模式
      "icon": "ms-appx:///ProfileIcons/{9acb9455-ca41-5af7-950f-6bca1bc9722f}.png", //图标
      "font": {
        "face":"MesloLGL NF", //字体
        "size": 12, //文字大小
        "weight": "thin", //文字宽度,可设置加粗
      },
      "colorScheme": "Solarized Dark", //主题名字
      "cursorColor": "#FFFFFF", //光标颜色
      "cursorShape": "bar", //光标形状
      "startingDirectory": "D://Projects//", //起始目录
      "antialiasingMode": "cleartype" //消除文字锯齿
    },
 }
复古的CRT 效果
"experimental.retroTerminalEffect": true
先说说复古模式,这个设计初衷是好的,我怎么觉得是眼瞎模式呢,本来300瓦的近视,开启这种模式之后,瞬间到500瓦了。
i7十代的 16G的配置,开启这种模式之后,卡成狗。很烧性能,但是装个逼什么的还是可以的,真正用起来,不建议使用,可能还在摸索阶段吧,Bug 多。放个图:
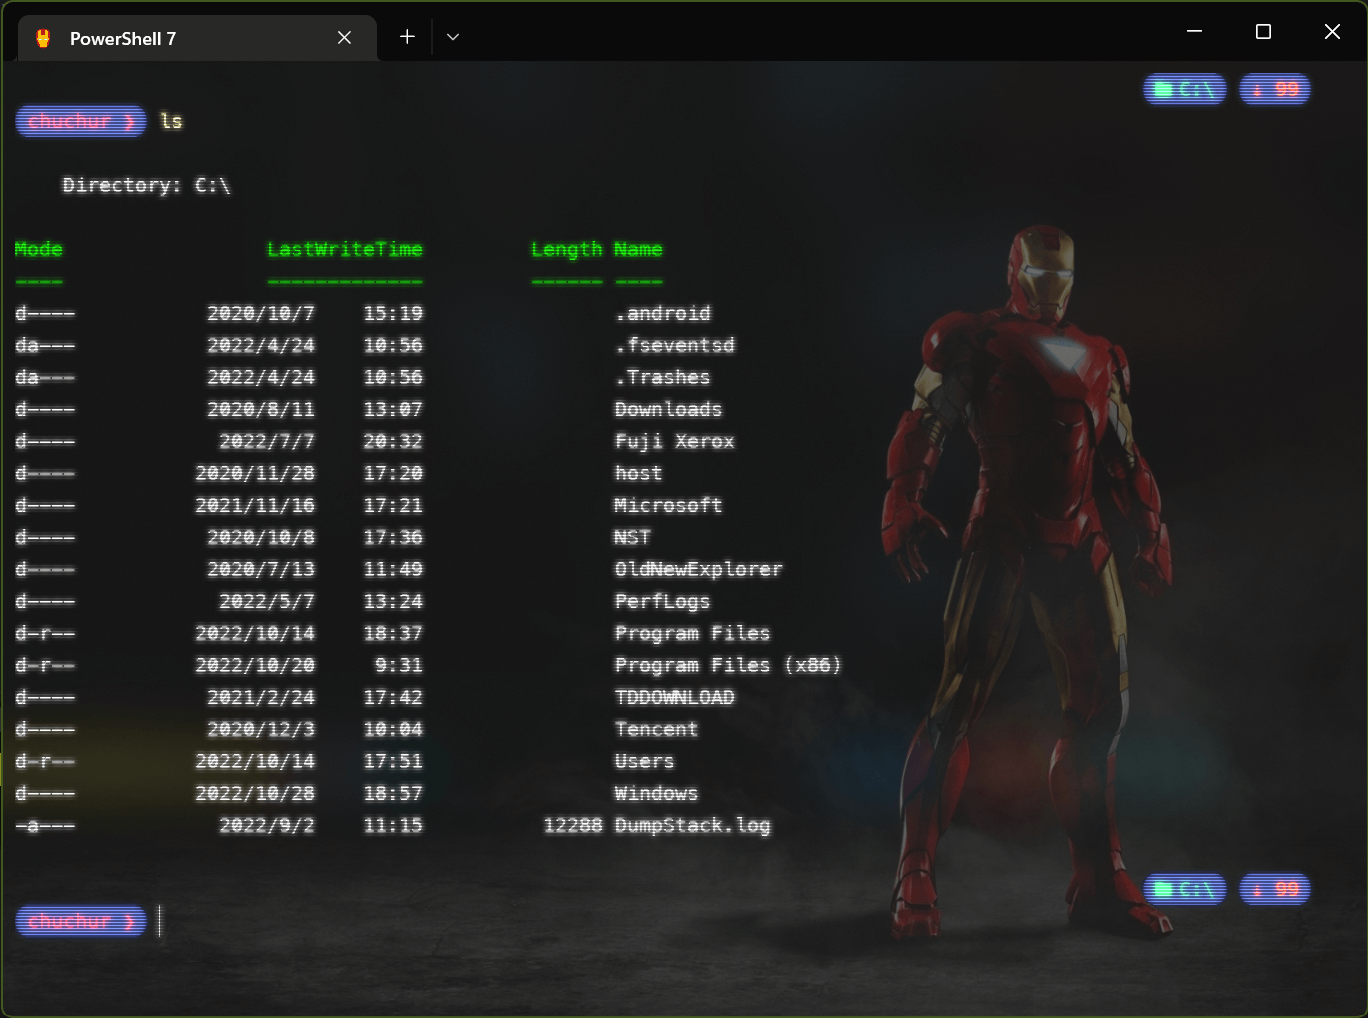
装逼专用配置😁
安装Oh-my-Posh
新的主题
Oh-my-Posh 官方已经说明了, 维护成本太大,微软又不给钱,索性对于通过 Install-Module 来安装的已经被毙掉了, 不再维护.... 如果之前已经安装了的,卸了吧
Uninstall-Module oh-my-posh -AllVersions
重新安装 :
winget install JanDeDobbeleer.OhMyPosh
#or
scoop install https://github.com/JanDeDobbeleer/oh-my-posh/releases/latest/download/oh-my-posh.json
winget 是微软自带的软件包管理工具
更新也很简单:
winget upgrade JanDeDobbeleer.OhMyPosh
# or
scoop update oh-my-posh
新的主题包 在 这里
随便找一个弄下来,找个位子存起来,比如这个 bubblesextra.omp.json
code $PROFILE
在打开的Microsoft.PowerShell_profile.ps1 ,写入一下内容:
oh-my-posh init pwsh --config D:\User\chuchur\OneDrive\ssh\bubblesextra.omp.json | Invoke-Expression
重新打开 terminal 就OK了。
经过对比主题, 发现bubblesextra.omp主题是最好用, 推荐这个。
新的命令
自动补全历史命令,逐字补全,powershell版本需要大于5.1 (下方有更新链接)
# 自动补全历史命令,逐字补全
Import-Module PSReadLine
Set-PSReadLineOption -PredictionSource History

#修改Tab补全为bash风格
Set-PSReadlineKeyHandler -Key Tab -Function MenuComplete

#全新的主题
oh-my-posh init pwsh --config D:\User\chuchur\OneDrive\ssh\bubblesextra.omp.json | Invoke-Expression
安装字体
Oh-my-Posh 是基于 Meslo LGM NF 字体设计的 ,V3 更新后 ,原来可以使用其他等宽字体, 但是更新之后就不好使了。 只能使用 Meslo 字体。
命令安装
重新以管理员方式 打开 Ternimal 。运行一下命令
oh-my-posh font install
在列出的字体列表上下翻页选择,找到 Meslo 安装即可。如果 安装失败,可以手动安装。
手动安装
在这里下载 Meslo LGM NF ---Github
快速下载 Meslo LGM NF ---CSDN
下载完成,解压到 C:\Windows\Fonts 目录下,字库就自动安装了 。
配置字体
安装完之后,在 profiles.json 文件
"profiles": {
    "defaults": {
      ....
      "font": {
        "face":"MesloLGL NF", //字体
        "size": 12, //文字大小
      },
      ....
    }
}
安装模块
语法
Install-Module [moudel name] -Scope CurrentUser #只为当前用户安装
权限设置
因为执行 Install-Module 会报错以下信息:
因为在此系统上禁止运行脚本。有关详细信息,
先以管理员权限运行 windows terminal ,然后执行以下命令:
##允许执行脚本
set-executionpolicy remotesigned
主题颜色美化
推荐使用 iterm2 的主题颜色,人家都已经写好了。直接使用就是了
打开 iTerm2-Color-Schemes , 找到配色的 .json 文件,把里面的配色复制到 schemes 下面就可以了。我这里选了两款Solarized的主题,
"profiles":{
  ...
},
"schemes":[
  {
    "name": "Solarized Dark",
    "black": "#002831",
    "red": "#d11c24",
    "green": "#738a05",
    "yellow": "#a57706",
    "blue": "#2176c7",
    "purple": "#c61c6f",
    "cyan": "#259286",
    "white": "#eae3cb",
    "brightBlack": "#475b62",
    "brightRed": "#bd3613",
    "brightGreen": "#475b62",
    "brightYellow": "#536870",
    "brightBlue": "#708284",
    "brightPurple": "#5956ba",
    "brightCyan": "#819090",
    "brightWhite": "#fcf4dc",
    "background": "#001e27",
    "foreground": "#708284"
  },
  {
    "name": "Solarized Darcula",
    "black": "#25292a",
    "red": "#f24840",
    "green": "#629655",
    "yellow": "#b68800",
    "blue": "#2075c7",
    "purple": "#797fd4",
    "cyan": "#15968d",
    "white": "#d2d8d9",
    "brightBlack": "#25292a",
    "brightRed": "#f24840",
    "brightGreen": "#629655",
    "brightYellow": "#b68800",
    "brightBlue": "#2075c7",
    "brightPurple": "#797fd4",
    "brightCyan": "#15968d",
    "brightWhite": "#d2d8d9",
    "background": "#3d3f41",
    "foreground": "#d2d8d9"
  }
]
然后应用配置:
"profiles": {
    "defaults": {
      ...
      "colorScheme": "Solarized Dark", //主题名字,就是上面的 "name"的值
      ...
    },
 }
到此美化就收工了。
分屏/ 多窗格 / 缩放
他可以像 Item2 一样 在同一 Tab 下 分屏,如下图:
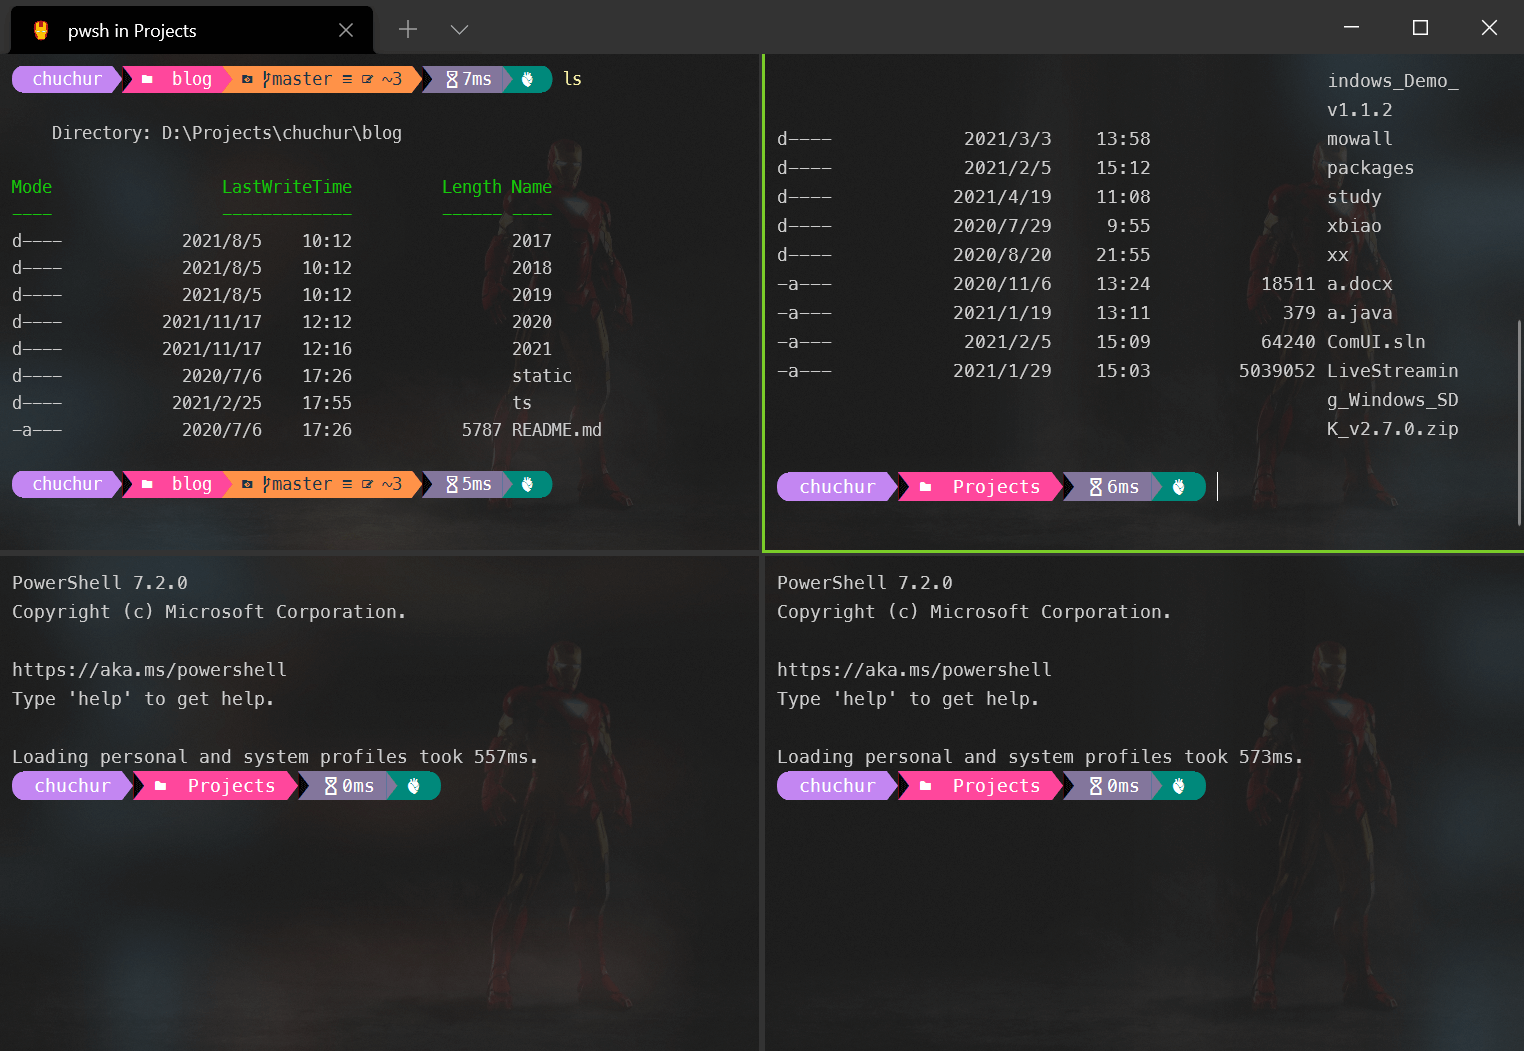
分屏快捷键如下:
水平分屏:Alt + Shift + 减号
垂直分屏:Alt + Shift + 加号
切换聚焦的分屏视图:alt + (left/right/up/down)
调节分屏的窗口大小:alt + shift + (left/right/up/down)
缩放当前视图:Ctrl+ 加号/减号 (或者 Ctrl + 鼠标滚轮)
那我不想分屏,我要删掉一个怎么办? 这个问题问的好,直接输入
exit即可退出分屏
子系统终端配置(WSL)
Terminal 配置完了,那肯定要配置子系统WSL啊。
一顿操作安装 zsh,oh-my-zsh
安装zsh
sudo apt install zsh
安装oh-my-zsh
sh -c "$(curl -fsSL https://raw.githubusercontent.com/ohmyzsh/ohmyzsh/master/tools/install.sh)"
# or
sh -c "$(wget -O- https://raw.githubusercontent.com/ohmyzsh/ohmyzsh/master/tools/install.sh)"
安装oh-my-posh
sudo wget https://github.com/JanDeDobbeleer/oh-my-posh/releases/latest/download/posh-linux-amd64 -O /usr/local/bin/oh-my-posh
sudo chmod +x /usr/local/bin/oh-my-posh
下载主题
mkdir ~/.poshthemes
wget https://github.com/JanDeDobbeleer/oh-my-posh/releases/latest/download/themes.zip -O ~/.poshthemes/themes.zip
unzip ~/.poshthemes/themes.zip -d ~/.poshthemes
chmod u+rw ~/.poshthemes/*.omp.*
rm ~/.poshthemes/themes.zip
看下默认的shell 如果 不是zsh,就把默认设置为zsh
查看默认shell
oh-my-posh get shell
切换默认shell
sudo chsh -s $(which zsh)
修改 ~/.zshrc,加入以下内容
eval "$(oh-my-posh init zsh)"
如果你的shell 是 bash,修改 ~/.bashrc 加入以下内容
eval "$(oh-my-posh init bash)"
二选一,最后:
# 如果你的shell是bash
source ~/.bashrc
exec bash
# 如果你的shell是zsh
source ~/.zshrc
exec zsh
重启之后看到是这样的,和Terminal差不多
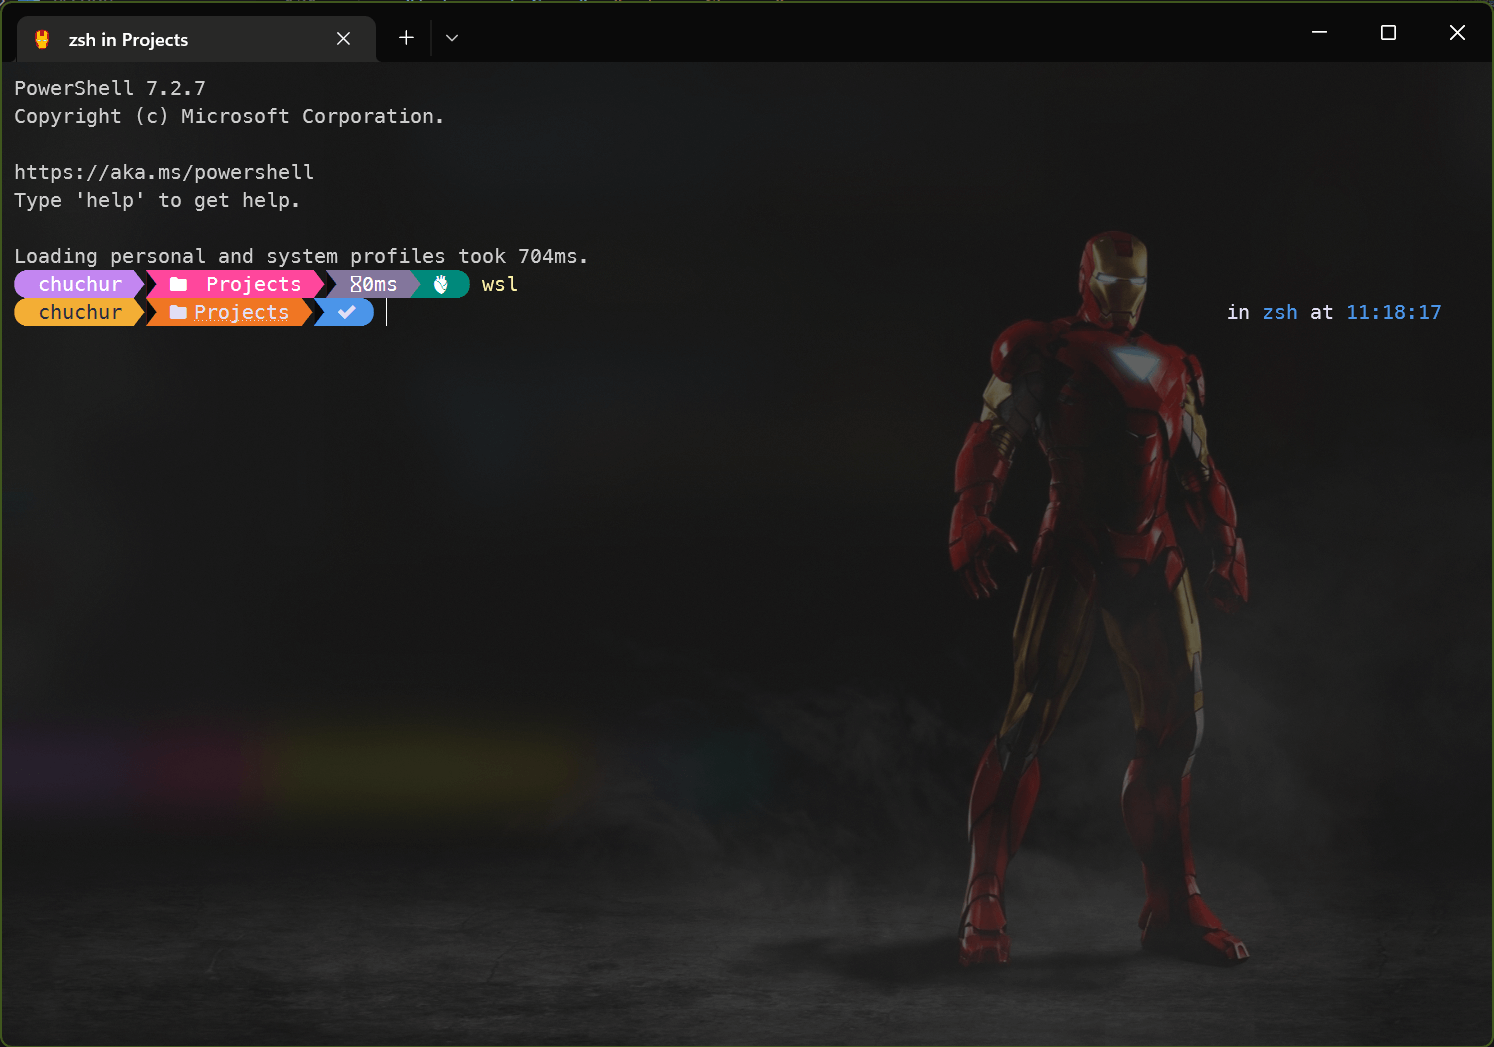
在VSCode 中的配置
背景图配置
背景图依赖插件 ,在这里下载安装,在市场搜索 background也可以。
安装完成之后,在配置里配置喜欢的图片即可
配置文件在菜单---文件--首选项---设置 ,点右上角有个小图标,最左边那个
{
  ....
  "background.fullscreen": {
      "image": "https://************/stack.jpg", // url of your image
      "opacity": 0.91, // 0.85 ~ 0.95 recommended
      "size": "cover" // also css, `cover` to self-adaption (recommended),or `contain`、`200px 200px`
  }
  ....
}
终端字体
终端字体,不是编辑器字体,不能搞错了
{
  "editor.fontFamily": "Consolas, 'Courier New', monospace",//不是这个
  "terminal.integrated.fontFamily": "MesloLGL NFM",
}
搞完了,上面看到的图就是了。
PowerShell 的更新
自带的 PS 版本 是 5.0 的 ,可以升级到更高版本, 目前稳定版本为 7.x
$PSVersionTable.PSVersion.Major   #查看Powershell版本
$PSVersionTable.CLRVersion.Major  #查看.NET Framework版本
在 这里 找到 ** x64.msi,下载安装即可。
安装完成之后, 在 list 里面加入路径即可 ,然后配置默认启动 defaultProfile 的值要对应 guid 的值,如下所示
"defaultProfile": "{69ef9424-c777-4798-a420-4b5afc2e13d9}",  //这里的
"profiles": {
  ...
  "list":[
    ...
     {
       "commandline": "D:/Programs/PowerShell/7/pwsh.exe", //你安装的位置
        "guid": "{69ef9424-c777-4798-a420-4b5afc2e13d9}",  //注意这里的值和上面的值对应
        "hidden": false,
        "name": "PowerShell 7"
     }
    ...
  ]
  ...
}
关于 ssh 的配置
新建 config 文件
在 .ssh 目录(就是你的.pub 默认生成位置, 通常是 C:\Users\[your name]\.ssh ),新建一个 config 文件,没有后缀,内容:
Host          aliyun
HostName      192.168.1.1
Port          22
User          root
IdentityFile  C:/Users/[your name]/.ssh/id_rsa
IdentityFile 是 ssh 的 key,你要自己生成。
配置 profiles.json
"profiles": {
  "list": [
    {
      "guid": "{9a138488-58fc-4a7a-b3c2-3af9ba5bc7bb}", //这个你要自己生成
      "commandline": "ssh aliyun",
      "name": "aliyun",
      "tabTitle": "aliyun-Linux"
    }
  ]
使用
直接执行:
ssh aliyun
这样就直接登录阿里云了。
关于 bash 的配置
环境变量配置
依次打开--控制面板--系统和安全---系统----高级系统设置, 找不到就 输命令
control system
系统属性---高级---环境变量---系统变量,找到 Path 变量,编辑,新建一个,把 git 的 bin 路径加进去,(如 D:\Program files\git\bin ),一路保存就可以了。
配置
"profiles": {
  "list": [
      {
        // Make changes here to the powershell.exe profile
        "guid": "{0caa0dad-35be-5f56-a8ff-afceeeaa6109}",
        "name": "bash",
        "tabTitle": "bash",
        "commandline": "bash.exe",
        "closeOnExit": true,
        "hidden": false,
        "snapOnInput": true, // 捕捉输入
        // "startingDirectory": "%USERPROFILE%"
        "startingDirectory": "d://Projects//dobo"
      },
  ]
}
以上就配置完成了,你新建 bash 标签。就可以使用 bash 了。
鼠标右键菜单的配置
这个需要改注册表来完成
新建一个文件wt.reg ,内容如下:
Windows Registry Editor Version 5.00

[HKEY_CLASSES_ROOT\Directory\Background\shell\wt]
@="贾维斯,来个命令窗口"
"Icon"="D:\\User\\chuchur\\OneDrive\\图片\\wt.ico"

[HKEY_CLASSES_ROOT\Directory\Background\shell\wt\command]
@="C:\\Users\\chuchur\\AppData\\Local\\Microsoft\\WindowsApps\\wt.exe"
第一个@ 是菜单项的名字,下面那个Icon 就是菜单项的图标,也可以不要,第二个@就是点击要执行的程序。
从商店安装的叫wt.exe, 自行编译的叫wtd.exe。 这个还是得区分下
保存,然后双击执行wt.reg,导入注册表,就完事了。搞完了如图:
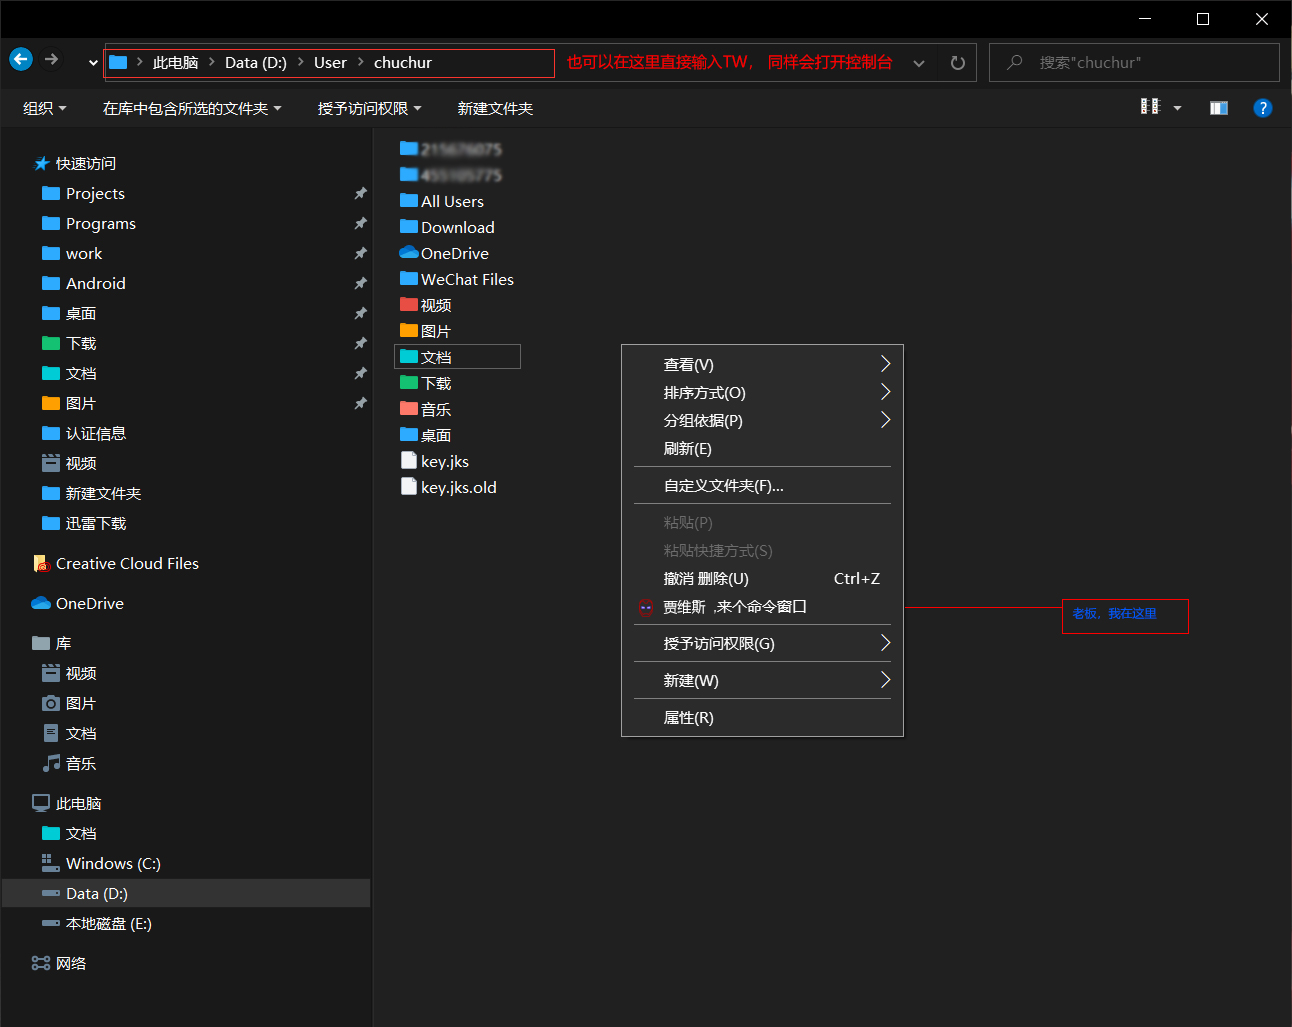
快捷执行方式
- 1.写在以上,搞定鼠标右键
- 2.Win+R 输入wt ,回车
- 3.在(资源管理器)地址栏输入wt 回车
